

This Is How They Cooked Before AC

There was a time when nobody thought it was strange to cook outside in August.
Before central air conditioning became standard, families had a simple way to keep the house from becoming an oven: move the hot cooking outdoors.
That old idea still makes a lot of sense.
If you've ever spent an August afternoon boiling jars of tomatoes, making a big pot of beans, grilling supper, or baking something in the oven, you know what happens. The kitchen heats up, the air conditioner runs harder, and suddenly the entire house feels ten degrees hotter.
Why put all that heat inside?
A summer kitchen gives you another option.
You Don't Need to Build Another Building
The words "summer kitchen" might conjure up an old farmhouse with a separate little building behind it.
You certainly can build one that way.
But you don't have to.
For most homeowners, a practical summer cooking area can be as simple as a covered patio, a sturdy workbench under an awning, a well-ventilated carport area, or a sheltered spot in the backyard.
The important things are shade, stability, ventilation, and keeping the cooking equipment safely away from the house and anything combustible.
The goal isn't to build something impressive.
The goal is to build something you'll actually use.
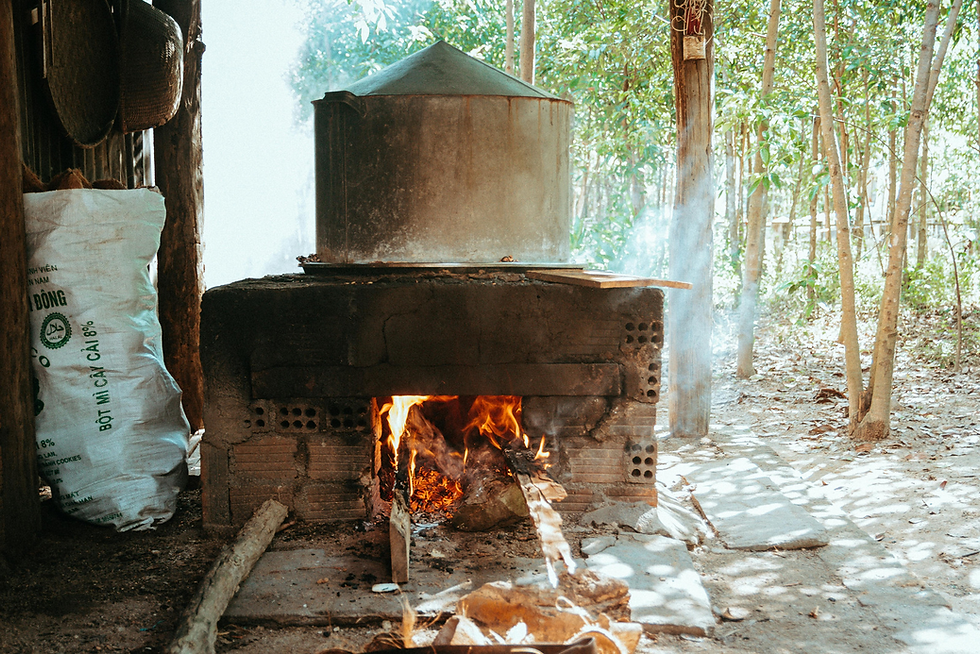
Put the Heat Outside
Think about everything that produces heat during summer cooking.
A large pot of boiling water.
A pressure canner.
A skillet full of bacon.
A grill loaded with steaks.
A pot of chili simmering for hours.
All of that heat eventually ends up inside the house if you're cooking indoors.
Moving those jobs outdoors has an immediate benefit: your living space stays cooler.
It can also make messy jobs easier.
Washing garden vegetables, shucking corn, trimming beans, processing tomatoes, cleaning fish, and preparing large batches of food are often more convenient when you have plenty of room to spread out.
That's one reason the old summer kitchen was more than just an outdoor stove.
It was a workshop for feeding the family.
_______________________________________________
Here is a SPECIAL OFFER for a product from one our trusted sponsors:
_______________________________________________
Start With a Good Workbench
If you want your outdoor cooking area to be useful, don't overlook the work surface.
A cheap little camping table may work for a burger or two.
It becomes a different story when you're handling several dozen pounds of garden produce.
You'll want a sturdy, washable surface with enough room for:
Pots and pans
Cutting boards
Bowls of produce
Canning equipment
Utensils
Hot lids and trays
Finished jars
Keep your clean food and finished products separated from dirty produce and used equipment whenever possible.
A few shelves, hooks, and storage bins can make a tremendous difference.
The older you get, the more you appreciate not having to bend over six times to find the tool you need.
Choose Your Cooking Method Wisely
An outdoor burner, grill, wood-fired stove, or other appropriate cooking appliance can handle jobs that would otherwise heat up the house.
But don't assume every burner is suitable for every job.
Canning equipment in particular needs to be used according to the manufacturer's instructions.
Excessive or uneven heat can damage equipment or interfere with proper processing.
And there is one rule that should never be compromised:
Never use fuel-burning cooking equipment in an enclosed space.
Propane, charcoal, gasoline, and wood-burning appliances can produce carbon monoxide. A garage, enclosed porch, shed, or other poorly ventilated area is not an acceptable substitute for being outdoors.
Good airflow isn't optional.

Don't Forget the Water
Outdoor cooking sounds simple until you're carrying water across the yard all afternoon.
You need water for washing produce, cleaning your hands, rinsing equipment, filling pots, and cleaning your work surface.
A safe water source near the cooking station can save a lot of unnecessary trips.
If you use containers, keep drinking water separate from water intended for washing.
And plan for wastewater.
You don't want greasy dishwater dumped beside the house, near a well, or in a spot where it will attract animals and insects.
A little planning before you start cooking will save considerable aggravation later.
Make It a Working Part of the Homestead
The best outdoor kitchen isn't something you drag out once a year.
Use it.
Cook breakfast outside on a hot morning.
Grill enough meat for several meals.
Make a big pot of soup or beans without heating the house.
Process vegetables from the garden.
Prepare messy foods outdoors.
Bake when your equipment allows it.
If you're doing any serious gardening or food preservation, an outdoor cooking station can become one of the most useful work areas on the property.
And there's another benefit: it gets you thinking about how much of your daily life depends on having one particular room, appliance, or utility available.
That's a useful lesson for anyone interested in self-reliance.

Keep Food Safety in Mind
Summer heat is hard on food.
Don't leave meat, dairy, cooked food, or cut produce sitting outside for extended periods. Keep cold foods properly chilled, protect food from insects, and separate raw meat from ready-to-eat foods.
Clean your knives, cutting boards, and work surfaces between jobs.
If you're canning, follow current tested recipes and proper processing procedures rather than relying on guesswork or an old family recipe that may not account for modern safety standards.
An outdoor kitchen doesn't change the rules of food safety.
Treat Fire Like Fire
There's nothing complicated about this.
Keep combustible materials away from burners and grills.
Store propane cylinders appropriately and away from excessive heat.
Keep gasoline well away from cooking equipment.
Keep firewood dry but protected from sparks.
Have an appropriate fire extinguisher accessible.
And make sure everybody using the cooking area knows how to shut down the equipment.
A summer kitchen should make life easier—not create another hazard to worry about.
You Can Build It One Saturday at a Time
Don't make the mistake of thinking you need a major construction project before you can start.
Begin with the basics.
Set up a solid table in a shaded location. Add an appropriate outdoor cooking appliance. Put your essential utensils, water, cutting board, pots, and cleaning supplies within reach.
Then cook something.
After you've used the setup a few times, you'll know what it needs.
Maybe it's better lighting.
Maybe you need another shelf.
Perhaps you need more shade or a larger work surface.
Build according to experience instead of spending a year designing something you'll discover doesn't suit your needs.
That's the practical way to do it.

The Old Idea Still Works
There's nothing fashionable or complicated about a summer kitchen.
That's part of its appeal.
It's an old-fashioned solution to a very ordinary problem: cooking produces heat, and August already has plenty of heat.
Moving the cooking outside keeps your house more comfortable, gives you additional workspace, and can make garden preservation and large-batch cooking considerably easier.
You don't need a fancy outdoor kitchen.
You need a safe place to cook, a solid place to work, adequate water, sensible organization, and the willingness to put the system to use.
The folks who came before us didn't always have expensive equipment or climate-controlled workshops.
They simply looked at a problem and found a practical way around it.
That may be the best lesson of the summer kitchen.
Sometimes the smartest new idea is an old one that still works.
_______________________________________________
Here is a SPECIAL OFFER for a product from one our trusted sponsors:
_______________________________________________


Comments